Metal roofing installation has gained popularity among homeowners seeking durable and energy-efficient roofing solutions. With its longevity, weather resistance, and esthetic appeal, metal roofing has become a top choice for many. Compared to an asphalt shingle roof, which is more traditional and generally easier to install, metal roofing offers long-term cost benefits, especially for homeowners planning to stay in their homes for an extended period. River City Roofing, with 20+ years of experience, recognizes the growing demand for metal roofs and their benefits for residential properties.
This comprehensive guide aims to walk homeowners through the metal roofing installation process. It covers selecting the right materials, preparing for installation, and the step-by-step procedure to install metal roofing. The article also provides insights on maintaining and caring for a new metal roof, helping homeowners make informed decisions about this significant home improvement project.
Choosing the Right Metal Roofing Material
Metal roofing has become a popular choice for homeowners due to its durability, energy efficiency, and esthetic appeal. When selecting the right metal roofing material, it’s essential to consider the variety of metal roofing materials available in the market and understand the importance of handling them carefully due to their sharp edges.
Types of Metal Roofing
There are two main metal roof systems used in residential roofing: standing seam and screw down. Standing seam metal roofs consist of panels locked together at the seams or mechanically seamed. The fasteners are hidden under the panels, earning it the name “hidden fastener metal roof.” This system offers a sleek, modern appearance and excellent water resistance.
Corrugated metal panels are the easiest and most affordable type of metal roofing to install, making them an appealing choice for consumers looking for cost-effective roofing solutions.
Screw down panel metal roofs, also known as exposed fastener roofs, feature panels fastened directly to the decking through the metal. While this system is more cost-effective, it may not be as durable as standing seam roofs for living spaces.
Factors to Consider
When choosing a metal roofing material, homeowners should consider several factors:
- Durability: Different metals offer varying levels of longevity and resistance to elements.
- Esthetics: Metal roofs come in various styles, colors, and finishes to complement different architectural designs.
- Cost: Prices vary significantly among metal roofing options, from more affordable steel to premium copper.
- Climate: Some metals perform better in specific environments, such as coastal areas or regions with extreme weather.
- Weight: The structural capacity of your home may influence the choice of metal roofing material.
Popular Metal Roofing Options
- Steel: A common and cost-effective option, steel roofing is available in various forms, including galvanized and stone-coated steel. It offers excellent durability and fire resistance.
- Aluminum: Lightweight and naturally resistant to corrosion, aluminum is an excellent choice for coastal areas. It’s also energy-efficient and can be easily formed into different styles.
- Copper: Known for its exceptional longevity, copper roofs can last over a century. While expensive, copper offers unparalleled durability, fire resistance, and a unique, evolving patina.
- Zinc: Popular in Europe, zinc roofs are highly durable and require minimal maintenance. They naturally develop a protective patina over time, enhancing their longevity.
- Stainless Steel: Offering superior corrosion resistance, stainless steel roofs are ideal for harsh environments. They provide a modern, industrial look and exceptional durability.
Each metal roofing option has its pros and cons, but there’s no inherently bad choice. The best selection depends on individual needs, budget, and esthetic preferences. Homeowners should consult with experienced roofing professionals to determine the most suitable metal roofing material for their specific situation.
Free Roof Inspections. Fast. Reliable.
Is your roof ready to weather the storm? Dont risk property damage. Our free roof inspections provide expert analysis to identify potential issues before they become costly problems.
Preparing for Metal Roof Installation
Measuring Your Roof
Accurate measurements are crucial for a successful metal roof installation. To begin, homeowners should sketch a top-down view of their roof. This sketch doesn’t need to be perfect, but it should include all major features.
Next, measure the length of the roof from one edge to the opposite side. Write down this measurement for later use. To determine the number of panels needed, divide the roof’s length by the width of the metal panels being installed. For example, if the roof is 30 linear feet (360 inches) long and using 24-inch standing seam roofing, 15 panels would be required for one side of the roof.
It’s important to measure both sides of the roof separately, as they may differ slightly in size. Additionally, measure from the fascia board to the ridge of the roof to determine the length of metal roofing panels needed for each side.
Gathering Necessary Tools and Materials
To ensure a smooth installation process, homeowners should gather all required tools and materials beforehand. Essential tools include:
- Fastener drivers
- Hand seamers for bending angles into the metal
- Electric swivel head metal shears for cutting panels
- Nibblers for cutting sheet metal with minimal distortion
- Blade cutters for smooth, rounded edges
- Metal snips for trimming metal sheets
- Sheet metal benders
- Tape measure for accurate measurements
It is crucial to use metal roofing screws to securely fasten the metal panels to the roof structure, ensuring durability and proper alignment during the installation process.
Additional materials needed for installation include:
- Closure strips
- Gooseneck vents
- Pipe flashings
- Screws (full stainless, stainless steel cap, tec, wafer head, zinc, and ZXL)
- Tarco Synthetic Underlayment
- X-Seal Tape
- Low-E insulation
Removing Old Roofing
When installing a metal roof over an existing shingled roof, it’s generally recommended to remove the old shingles completely. However, there is an option to install corrugated metal roofing over existing shingles. Despite this, removing the old roofing materials is crucial for a proper foundation. This approach offers several benefits:
- Ensures a flat surface: Removing shingles allows the metal roof to lay flat on the roof decking, preventing uneven surfaces that could interfere with proper installation.
- Moisture management: Stripping the old roof enables better assessment and management of underlying moisture or ventilation issues, preventing future problems like mold or rot.
- Improved insulation and airflow: Starting with a clean deck provides an opportunity to enhance insulation and airflow, improving the overall performance and energy efficiency of the new metal roof system.
- Weight considerations: Metal roofing is relatively lightweight, but adding it to an existing layer of shingles might exceed the load-bearing capacity of the roof structure.
- Inspection and repairs: Removing shingles allows for a thorough inspection of the roof deck, enabling identification and repair of any damaged sections before installing the metal roofing.
After removing the old shingles, ensure there are no nails sticking up from the roof deck. Apply ice and water shield over the entire roof before installing the metal roofing panels. This preparation process helps create a solid foundation for the new metal roof, ensuring its longevity and optimal performance.
Step-by-Step Metal Roof Installation Process
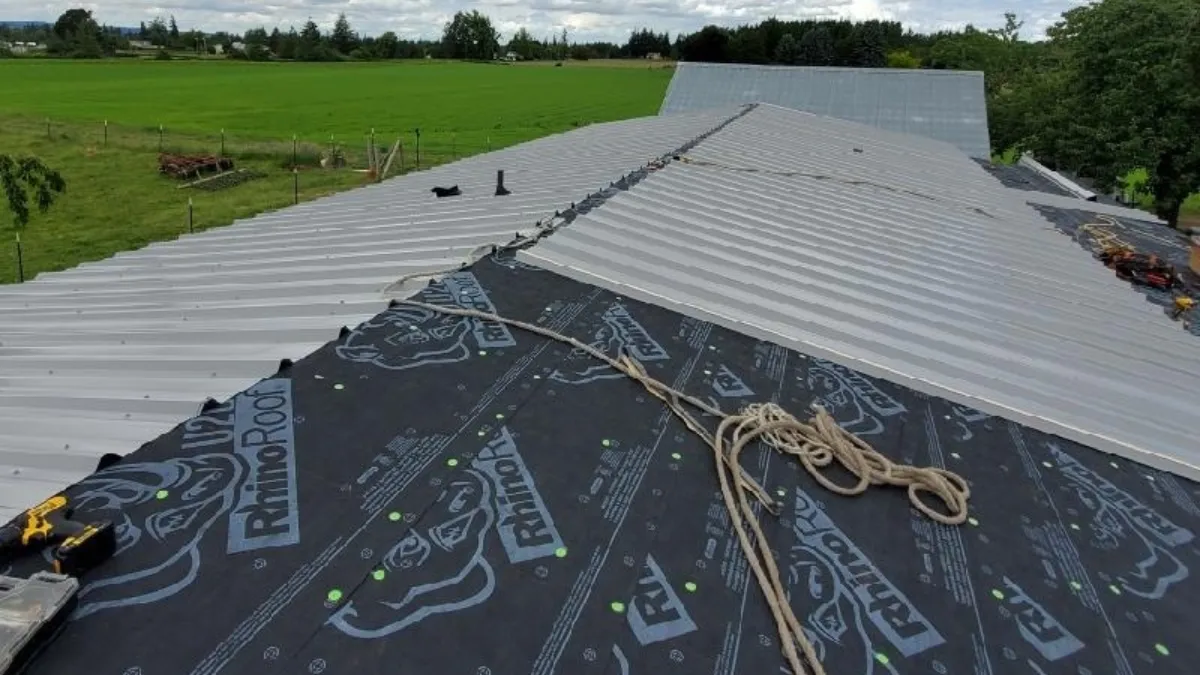
Installing Underlayment
The first step in metal roofing installation is laying the underlayment. This crucial layer protects the roof deck from moisture and enhances the overall performance of the roofing system. Begin by ensuring the roof deck is clean, smooth, and dry. Install synthetic underlayment horizontally, starting at the bottom of the lowest roof eave. Allow for a 1.5″ overhang at the eave and roof rake edge. For roofs with a 3:12 pitch or greater, overlap horizontal courses by 4″ and vertical courses by 12″. For pitches between 1.5:12 and 3:12, increase these overlaps to 6″ and 20″ respectively.
Secure the underlayment using 1″ diameter plastic cap roofing nails. In normal wind zones, space nails 6″ on center at head and end laps, and 24″ on center in the field area. For high wind zones or coastal applications, increase fastening to 4″ on center at laps and 12″ on center in the field.
Adding Flashing and Trim
Next, install drip edge along the eave and gable ends. For the eave, use a simple L-shaped piece that fits over the wood strip and extends down the fascia. At gable ends, you have two options: use the same drip edge piece underneath the metal panels, or install a gable trim piece on top of the panels after they’re in place.
When overlapping trim pieces, use the factory-cut edge to overlap the field-cut edge for a cleaner appearance. Ensure the drip edge goes over the back edge of the gutter to direct water properly. For areas with gutter hangers, notch the drip edge to accommodate them.
Laying Metal Panels
Before laying panels, install foam closure strips along the eave, about one inch from the edge. These strips prevent bugs and water from getting underneath the panels. Apply a bead of sealant on top of the closure strips.
Start laying panels at one end of the roof, ensuring they overhang the eave by one inch. Use a string guide along the eave to keep panels straight and aligned. This helps prevent a “sawtooth” pattern at the edge, which can occur if panels veer off course.
Securing Panels
When securing panels, use the appropriate fasteners for your specific roof type. For metal-to-metal applications, use self-drilling screws that can penetrate both the panel and the purlin. For metal-to-wood applications, use sharp point screws that can securely hold in the wood substrate.
Place screws on both sides of every rib at the eave, aligning them with the foam closure strips. Space subsequent rows no more than 24 inches apart, with one screw at each rib on the overlapping side. Work from the bottom up, fastening across the panel in rows.
Finishing Touches
After installing all panels, attach the gable trim to clean up the edge and prevent water infiltration. Apply butyl tape on the underside of the trim where it meets the flat part of the roof panels. Secure the trim with screws every 12 inches.
Finally, cap the roof by installing ridge caps. Adhere a line of outside closure strips with butyl tape four inches from the peak. Apply sealant on the foam closures, then fit the ridge cap and fasten it with two-inch screws through every rib into the roof deck.
Remember to clean up any metal shavings immediately to prevent rust stains. Also, touch up any scratched areas with manufacturer-recommended paint to maintain the roof’s appearance and protect against corrosion.
Maintenance and Care for Your New Metal Roof
Routine Inspections
Regular roof inspections are crucial for maintaining the longevity and performance of a metal roof. Homeowners should conduct visual checks at least twice a year, preferably in spring and fall. During these inspections, they should look for debris, discolorations, and potential surface damage visible to the naked eye from the ground. It’s advisable to observe the roof from different angles, including from the road and the yard, making notes about any findings related to debris or weather damage.
Cleaning Tips
Metal roofs are relatively easy to clean, but specific care requirements must be followed to maintain their integrity. The first step in cleaning involves using water to remove airborne dirt, leaves, pollen, and twigs. For more stubborn stains or deposits, a gentle cleaning solution can be used.
To clean a metal roof effectively:
- Choose an overcast day with mild temperatures for cleaning.
- Use a garden hose to spray off loose debris.
- For tougher dirt, mix a gentle solution of ¼ cup of mild laundry detergent or car washing soap per gallon of water.
- Apply the solution using a nonabrasive sponge, soft washcloth, or very soft bristle brush.
- Let the solution sit for 5-10 minutes, then rinse thoroughly with clean water.
It’s crucial to avoid harsh chemicals, abrasive tools, or high-pressure power washers, as these can damage the roof’s protective coatings and void warranties.
Addressing Common Issues
Metal roofs may encounter several issues over time, but proper maintenance can help prevent or address them effectively:
- Oil Canning: This waviness in metal panels can be minimized by choosing thicker-gage metal, low-gloss finishes, or tension-leveled metal during installation.
- Corrosion: Select corrosion-resistant materials like galvanized steel, aluminum, or zincalume. Regular cleaning and applying protective coatings can help prolong the roof’s lifespan.
- Scratches and Scuffs: Address these promptly to prevent corrosion. Most scratches can be fixed with a manufacturer-approved touch-up paint.
- Chalking and Fading: While inevitable, the degree of chalking and fading depends on environmental factors. Many reputable manufacturers offer paint warranties covering excessive chalking and fading.
- Thermal Movement: Proper installation with expansion joints and appropriate fasteners is crucial to accommodate thermal movement and prevent issues.
By following these maintenance practices and addressing issues promptly, homeowners can ensure their metal roofs remain in optimal condition, maximizing their durability and esthetic appeal for years to come.
Conclusion
Metal roofing installation has proven to be a game-changer for homeowners seeking long-lasting and energy-efficient roofing solutions. This guide has walked through the key aspects of the process, from choosing the right materials to the step-by-step installation and maintenance tips. By following these guidelines, homeowners can ensure a successful metal roof installation that enhances their property’s value and protects it for years to come.
For those considering a metal roof, it’s crucial to work with experienced professionals. Their knowledge can be invaluable in navigating the complexities of metal roofing installation and maintenance. Remember, a well-installed and properly maintained metal roof is not just a practical choice, but also an investment in your home’s future.
FAQs
What are the steps to install a metal roof?
To install a metal roof, follow this seven-step guide:
– Prepare and Plan: Start by thoroughly inspecting your current roof to assess its condition.
– Remove the Old Roofing: Clear away any old roofing materials.
– Install the Underlayment: Lay down the underlayment to act as an additional barrier against weather conditions.
– Install Flashing: Place flashing to prevent water from penetrating the structure.
– Metal Panels Installation : Carefully mount the metal panels onto the roof.
– Install Ridge Caps and Trim: Add ridge caps and trim to cover and seal the joints.
– Final Inspection and Cleanup: Conduct a final review of the installation and clean up the site.
Is it feasible to install a metal roof by myself?
Yes, it is possible to install a metal roof yourself, especially if you have advanced DIY skills. However, be aware that the installation process can be complex and may vary depending on the specific metal roofing products you choose.
What should be avoided when installing a metal roof?
When installing a metal roof, it is crucial to avoid certain mistakes, such as improper spacing of screws, not allowing for expansion and contraction of the metal panels, and inadequate sealing of the joints. These errors can compromise the roof’s integrity and effectiveness.
What should be placed underneath a metal roof during installation?
Underlayment should be placed beneath a metal roof during installation. This layer provides additional weather resistance and moisture protection, making it an essential component of a proper metal roofing system.
Comments are closed