

When it comes to roofing, one of the most important yet often overlooked details is roof pitch. More than just a measurement, pitch determines how steep a roof is, how well it sheds water and snow, which materials work best, and even how safe or costly installation will be. Whether you’re a homeowner planning a replacement, a contractor working on new construction, or simply curious about architectural design, understanding roof pitch is essential. This guide breaks down what roof pitch means, how to measure it, why it matters, and the different types commonly used in construction.
What is Roof Pitch?
A roof’s pitch shows how steep it is through a ratio of vertical rise to horizontal run. This measurement tells you how many inches the roof goes up for every 12 inches it runs horizontally. To cite an instance, a 4/12 pitch means the roof rises 4 inches for each foot going across. A 9/12 pitch goes up 9 inches over that same distance, making it much steeper.
You’ll see the pitch ratio written with two numbers using a slash (4/12) or a colon (4:12). The first number shows the rise in inches, and the second shows the run, which stays at 12 inches in imperial measurements. The higher the first number gets, the steeper your roof becomes.
Roofs come in two main types: pitched (slanted) and flat (low slope). Most homes have moderate pitches between 4/12 and 9/12, though you can find roofs ranging from almost flat to nearly vertical. Each pitch serves a specific purpose in architecture and function.
People often mix up pitch and slope, but they’re different. The pitch measures the total vertical rise against the total horizontal span. The slope shows the rise compared to the run (half the span), usually based on 12 inches in imperial units. A roof with a 1/6 pitch equals a 4:12 slope.
The way we measure pitch has deep historical roots. In the old days, pitch meant comparing ridge height to building width. A roof going up 8 feet over a 24-foot span had a “1 to 3” pitch. You could write this as the fraction 1/3, showing how much it rises over the whole span.
Your roof’s pitch affects everything about your roofing system – from material choices to drainage and weather protection. A well-pitched roof moves water away from your home quickly and cuts down leak risks. The pitch also determines how well your roof handles snow and debris, which affects how long it lasts and how much maintenance it needs.
Knowing your roof’s pitch helps you make smart choices about materials and upkeep. This knowledge becomes extra valuable when you’re building a new roof or replacing an old one, especially in areas with changing weather patterns throughout the year.
How to Measure Roof Pitch
You’ll need specific tools and techniques to measure roof pitch accurately. Your access point and preference will determine which method works best. Here are several reliable ways to get this vital measurement.
Using a level and tape on the roof
The quickest way involves a 12-inch level and tape measure. Start by placing the level horizontally on the roof surface and make sure the bubble stays centered. Make a mark exactly 12 inches from where the level touches the roof. The next step is to measure straight up from your mark to the roof surface. This vertical measurement shows your rise over a 12-inch run. To cite an instance, a 5-inch rise means you have a 5:12 pitch.
Your safety is the biggest priority on rooftops. You should always use proper fall protection and stay off the roof in wet or windy weather.
Measuring rafters from the attic
The attic provides a safer way to get equally accurate results. Take your level and hold it against the rafter’s bottom edge – it needs to be perfectly horizontal. Make a mark 12 inches from the point where your level meets the rafter. The next step is to measure straight up from this mark to the underside of the rafter. This number directly shows your roof pitch ratio.
You’ll get more precise measurements in the attic than on uneven roofing materials. The flat surfaces inside make the work easier and safer.
Using smartphone apps or pitch cards
Innovative technology gives you alternatives to traditional measuring methods. Apps of all types use your phone’s camera or built-in gyroscope to figure out the pitch. Camera-based apps work best when you stand directly in front of the rake at a distance. For apps that use the gyroscope, place your phone on a flat clipboard against the roof surface.
Pitch cards are another option to estimate the slope. These see-through cards have angled lines that help you approximate the pitch by lining them up with the roof from a distance. While they’re not as exact as direct measurements, pitch cards are a great way to get quick initial readings.
Whatever method you pick, knowing how to measure roof pitch accurately helps you choose the right materials and plan the installation properly.
Why Roof Pitch Matters in Construction
Your roof’s pitch plays a crucial role in construction costs, safety practices, and how long your roof will last. The steepness creates a ripple effect that shapes both the original installation and performance over time.
Affects roof surface area and square footage
The pitch multiplier shows how slope affects material needs. A 5/12 pitch needs 8% more materials than a flat surface, while a 9/12 pitch needs 25% more. This follows the Pythagorean theorem – steeper pitches create bigger surface areas even when the footprint stays similar.
Take a home with a 2,000 square foot footprint. A 5/12 pitch expands the actual roof area to 2,160 square feet (2,000 × 1.08). Small pitch errors can lead to big cost changes. A three-degree error could mean an 80 square foot difference, which adds about $430 to material costs.
Affects labor and safety requirements
OSHA rules call roofs with pitches at or below 4/12 “walkable,” and these need minimal safety gear. Steeper pitches of 6/12 or more need detailed fall protection systems because workers face higher risks.
These safety rules affect project schedules and costs. A 7/12 pitch adds about 20% more labor time. A 9/12 pitch is a big deal as it means that labor needs increase by over 50%. Workers move slower on steep surfaces and must follow extra safety steps.
Determines suitable roofing materials
Each pitch works best with specific roofing materials:
- Low-slope (0.25:12 to 3:12): These need continuous waterproof membranes like EPDM rubber, TPO, built-up roofing (BUR), or torch-down systems
- Medium (4:12 to 6:12): These work with many options including asphalt shingles, metal panels, and some tile products
- Steep (above 6:12): These support almost all roofing materials but often feature slate, clay tiles, or premium shingles
Using the right materials for your pitch affects how well your roof works and how long it lasts. Wrong materials might void warranties or cause early failures.
Influences drainage and weather resistance
Your roof’s angle determines how well water drains. Steeper pitches help water run off faster, which reduces leak risks. Quick drainage prevents water pools that can damage materials and weaken the structure.
The pitch also affects how roofs handle snow – this matters a lot in cold regions where heavy snow can stress the structure. Steeper roofs (6/12 to 10/12) naturally clear snow before it becomes dangerous.
Wind resistance changes with pitch too. Steeper roofs deflect winds better in some cases, but lower-pitched roofs might work better during certain storms.
Common Types of Roof Pitch and Their Uses
Roof pitch categories align with specific architectural needs and functional requirements. Different slopes provide unique benefits based on climate, looks, and building purpose.
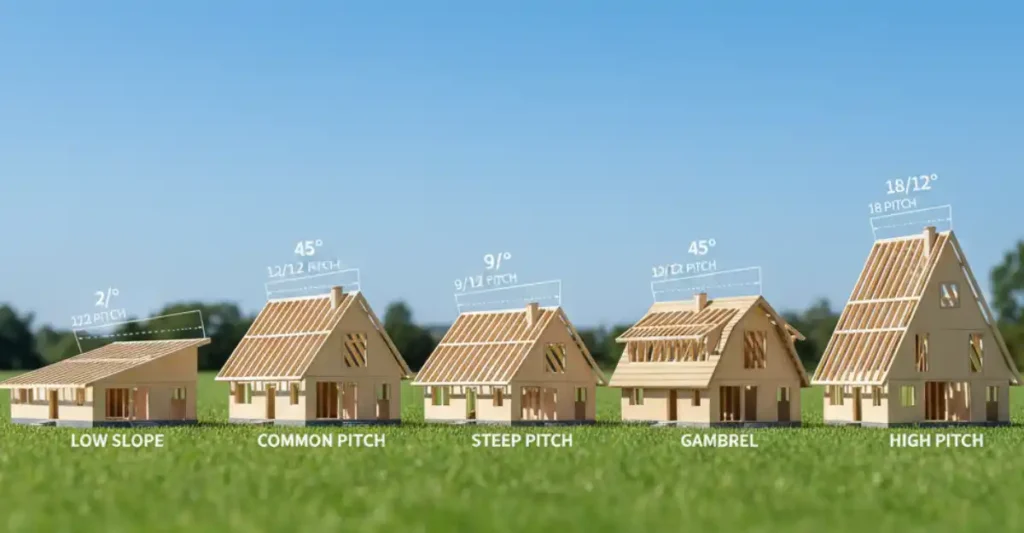
Flat and low-slope roofs
Flat roofs have a pitch between 0.25/12 and 2/12, which lets water drain while stopping puddles from forming. You’ll see these systems on commercial buildings, and they’re becoming popular in homes too. The name “flat roof” is misleading since they need at least 0.25 inches of slope per foot to drain water properly. These roofs can be built with asphalt, modified bitumen, or single-ply membranes like EPDM, PVC, or TPO.
Standard residential pitches
Most homes have conventional pitches from 4/12 to 9/12. A 4/12 pitch works well for ranch-style homes where snow isn’t a problem. The 6/12 pitch hits the sweet spot between looks and function for many architectural styles. Houses like Cape Cod, colonial, and Victorian styles do great with 8/12 pitches that easily shed snow and rain. These medium slopes work with almost any roofing material, including asphalt shingles with single underlayment.
Steep and high-pitch roofs
Pitches over 9/12 are considered steep-slope roofs. Water and snow slide off these dramatic slopes quickly, which helps in areas that get lots of rain or snow. But there’s a catch – steep pitches cost more to install. A 9/12 pitch needs about 50% more work than lower slopes because of safety rules and harder access. The upside is you get more attic space and better curb appeal.
Historical pitch styles
Each architectural period had its own signature roof pitch that balanced style and practicality. Colonial builders chose steep gabled and gambrel roofs to handle water runoff. Victorian homes showed off steep pitches with fancy slate patterns and decorated ridges. Gothic buildings featured dramatic pointed gables. Georgian architecture kept things simpler with 39-40 degree pitches and balanced design elements.
Conclusion
Roof pitch is more than a technical detail—it’s the foundation of your roof’s performance, durability, and style. From influencing drainage and material choices to shaping installation costs and safety requirements, pitch directly affects how well your roof protects your home. By learning how to measure and understand pitch, you’ll be better equipped to make informed decisions during construction or replacement. Whether you’re dealing with a low-slope commercial roof, a standard residential design, or a steep architectural style, the right pitch ensures both long-term function and lasting curb appeal.