
Have you ever wondered what could go wrong during a roof replacement? Your new roof should protect your home for decades, but the process can get complicated.
Even with careful planning, your roofing project might face unexpected delays and problems. Bad weather can damage partially removed roofs, and your driveway might get crowded with equipment and materials. Many homeowners deal with challenges they never predicted. Improper flashing installation creates serious leak risks. Your roof’s material choice could lead to poor insulation or quick deterioration. Inexperienced contractors often deliver subpar workmanship.
The biggest problem behind roofing disasters? Homeowners try to complete the work as cheaply as possible. Understanding potential problems helps you prevent these issues and ensures your new roof delivers the protection and longevity your home needs.
Improper Shingle Installation
Your roof’s defense system relies heavily on proper shingle installation. Many contractors rush through the work or lack experience, which puts this crucial aspect of roof replacement at risk. A good understanding of shingle installation techniques helps you spot issues before they cause expensive damage.
What is improper shingle installation?
Roofing materials need placement according to manufacturer specifications and industry best practices. Any deviation from these installation guidelines can compromise your roof’s integrity and performance.
The International Building Code demands proper installation to get optimal shingle performance. Contractors who take shortcuts or don’t have adequate training create weak points that can substantially reduce your roof’s lifespan and effectiveness.
Shingle manufacturers provide detailed product instructions with specific requirements for nailing patterns, alignment, and exposure. Your manufacturer’s warranty becomes void if contractors don’t follow these guidelines—leaving you without protection when problems develop.
These key elements make up a proper installation:
- Correct nail type and placement
- Appropriate shingle alignment and overlap
- Proper exposure (the visible portion after installation)
- Accurate offsetting between courses
Your new roof becomes vulnerable to damage much earlier than expected when contractors compromise any of these elements.
Common roofing mistakes with shingles
Incorrect nailing ranks as the most common installation error. Asphalt shingles need specific nail placement within what manufacturers call the “nailing zone” or “nailable area.” Laminated shingles typically have a narrow band (about 0.5 to 1.5 inches wide) where the upper and lower laminates overlap.
Contractors often make these nail-related mistakes:
- Overdriven nails: Improperly adjusted pneumatic nail guns can punch nail heads through the shingle material instead of sitting flush. This weakens the holding power and creates water entry points.
- Underdriven nails: Nails that don’t sit flush with the shingle surface push up against the overlying shingle. This creates raised areas that wind can damage.
- High nailing: Nails placed above the manufacturer’s designated strip miss the underlying shingle. This cuts the fasteners per shingle in half, making them likely to slip.
- Exposed nails: Low nail placement leaves them exposed to the weather, which creates immediate leak risks.
Improper shingle alignment creates another common failure point. Shingles need proper horizontal and vertical alignment. Chalk lines help ensure straight courses across the roof. Poor alignment leads to:
- Wavy or crooked shingle lines
- Uneven exposure between courses
- Mismatched patterns that hurt appearance and function
Incorrect offsetting between courses creates weak spots. Shingles should stack like bricks in a wall to stop water from finding a direct path through joints. Vertical gaps line up between courses when contractors don’t offset properly, which creates channels for water to penetrate.
Improper exposure happens when contractors leave too much or too little of each shingle visible after installing the overlapping course. Manufacturers specify exact measurements for optimal performance. Wrong exposure leads to early aging and failure.
These errors result in:
- Shingles that slip or blow off in the wind
- Water damage to the structure
- Failed seals between courses
- Buckled and raised tabs
- Early granule loss
- Shorter roof life
Poorly installed shingles often create what professionals call “slipped shingles”—groups that stay sealed to each other but move from their original spot, sometimes sliding right off the roof.
How to ensure correct shingle placement
Quality installation starts with hiring skilled professionals and knowing what good work looks like:
Choose reputable contractors with licenses, insurance, and manufacturer certifications. Check their references and previous projects. Good contractors explain their methods openly and know manufacturer requirements.
Verify proper nail application by checking:
- Nail type and size (typically 11- or 112-gauge with minimum 3/8-inch heads)
- Nail length goes through the roof deck (minimum 3/4 inch into the wood deck)
- Each shingle has four to six nails (six for steep slopes or high-wind areas)
- Nails sit in the designated zone
- Nail heads rest flush without cutting the shingle
Ensure proper alignment and offset by watching contractors use chalk lines for straight courses. The bottom edge of laminated shingles should line up with the underlying course’s saw teeth tops.
Watch the installation when possible. Look for:
- Careful measurements before placement
- Even exposure between courses
- Proper course offsetting (typically 2+ inches)
- No visible nails on the finished surface
- Smooth appearance without waves
Fix any installation issues right away. You can tap down underdriven nails until flush. Overdriven or crooked nails need removal, hole filling with ASTM D4586-compliant asphalt roof cement, and new nail placement nearby.
Get documentation showing installation meets local building codes and manufacturer specifications. This paperwork helps with warranty claims and future home sales.
A well-installed shingle roof protects your home for decades. Understanding common errors and prevention methods helps ensure your roof replacement delivers expected performance and longevity.
Skipping Underlayment or Using the Wrong Type
Your roof’s defense system relies heavily on an invisible layer beneath the shingles. You can’t see the underlayment after roof completion, but skipping it or installing it incorrectly can put your entire roofing investment at risk.
Why is underlayment essential?
A moisture-resistant barrier sits directly between your roof deck and outer shingles. This protective layer acts as your second line of defense against the elements.
Not even top-quality shingles are completely waterproof. The underlayment protects your wooden roof deck from rain, snow, and ice that might get through the shingles. If shingles get damaged or blow off during bad weather, underlayment provides significant backup protection until you can make repairs.
This vital layer offers multiple benefits to your roofing system:
- Improved moisture protection: Blocks water from getting into your home
- Structural preservation: Protects your roof deck from direct exposure to elements, preventing rot and warping
- Better energy efficiency: Adds insulation that helps maintain indoor temperatures
- Extended roof longevity: Spreads weight and reduces stress on outer roofing materials, limiting wear and tear
The International Building Code requires underlayment installation for residential roofing systems. Most roofing material manufacturers demand underlayment to keep their warranties valid. Without this layer, you’ll get poor roof performance and might lose your warranty protection.
Risks of skipping or reusing underlayment
Trying to save money by skipping underlayment is nowhere near worth it. The damage can be extensive and long-lasting. Water gets direct access to your roof deck without this protective barrier, creating perfect conditions for problems.
Here are the immediate risks of skipping underlayment:
- Water damage and structural deterioration: Moisture reaches your roof deck directly, causing rot, mold, and possible structural failure
- Accelerated shingle deterioration: Your shingles wear out faster without underlayment to distribute weight and minimize stress
- Voided warranties: Manufacturers won’t honor warranties without proper underlayment installation
- Building code violations: Your home could fail inspections or face resale issues since most local codes require underlayment
- Reduced energy efficiency: Your energy bills might increase as your home doesn’t maintain consistent temperatures
Reusing old underlayment during roof replacement creates substantial risks, too. Old underlayment usually shows wear, tear, and water damage that compromises its protection.
Nail holes from the previous installation make it impossible to get a watertight seal the second time. Wet old felt can wrinkle and prevent shingles from lying flat, making your finished roof look uneven.
Old underlayment might hide rot or mold in your roof deck, preventing proper inspection and fixes. Building codes usually require the removal of all existing layers down to the roof deck to avoid these issues.
Best practices for underlayment installation
The right underlayment material depends on your specific roofing needs. Three main types lead the market:
Asphalt-saturated felt is the traditional choice. It costs less but tears easily during installation and can wrinkle from moisture, affecting your roof’s look.
Synthetic underlayment gives you better durability with tear resistance, easier installation, and moisture protection. Many synthetics come with printed guides for accurate placement.
Rubberized asphalt underlayment offers premium waterproofing that sticks to itself. It works great in leak-prone areas like eaves, valleys, vents, chimneys, and skylights.
Follow these key steps for proper installation:
Your roof deck needs proper securing, complete drying, and cleaning before installation. Let underlayment materials adjust to the job site for 24-48 hours to prevent future wrinkling or buckling.
Follow manufacturer guidelines for horizontal and vertical overlap—usually 2-4 inches. Button cap fasteners work best with synthetic or felt underlayment, giving better seals and a stronger hold in high winds.
High-risk areas need extra attention. Around skylights, chimneys, rakes, and shed walls, the underlayment should extend at least 12 inches up adjacent walls and blend with drainage planes, wall cladding, and roof flashing.
Valleys need special care as they’re critical water routes. Use self-adhered underlayment that overlaps at least 6 inches through the valley. Keep fasteners 12 inches or more from the valley center.
Drip edges need correct placement to shed water properly. Most regions require drip edges over the underlayment along rake edges and under it at eaves. This protects your roof deck and fascia from wind-driven rain and reduces leak risks.
Understanding the underlayment’s role and getting the selection and installation right helps you avoid common roofing mistakes that lead to early roof failure and expensive repairs.
Poor Attic Ventilation and Insulation
Your attic’s ventilation system plays a crucial role in roof health, yet roofers often overlook it during replacements. This invisible system works among other components, like insulation. It can mean the difference between a roof lasting decades or failing early.
How ventilation affects roof lifespan
Good attic ventilation lets your home breathe naturally. The continuous airflow prevents heat and moisture from getting trapped – two elements that can destroy your roof.
Summer heat can push a poorly ventilated attic’s temperature to 140°F on a 90°F day. This extreme heat doesn’t just make your home uncomfortable. It bakes your roofing materials from underneath. The intense heat breaks down roof deck adhesives and makes shingles crack, distort, or curl before their time.
Winter brings different but equally serious problems. Warm air rises from your living space into the cold attic. This creates condensation on cool surfaces. The trapped moisture soaks the roof decking and leads to waves and buckles in both the deck and shingles.
The excess moisture also makes your insulation less effective and can leak through to your ceilings. Wood rot, mold, and mildew follow, damaging your home’s structure and reducing indoor air quality.
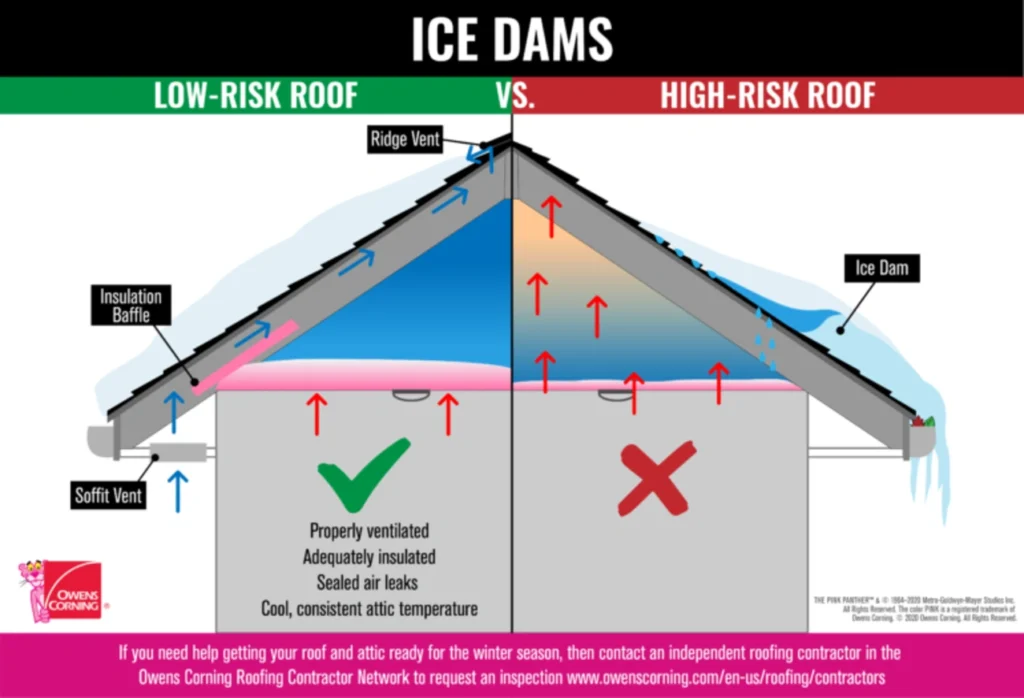
Cold-climate homeowners face another serious issue – ice dams. Heat builds up in poorly ventilated attics and melts roof snow even in freezing temperatures. The melted snow refreezes at the eaves and gutters. These ice dams force water back under shingles and into homes.
Experts say good ventilation and insulation create a “balanced system.” This needs both intake ventilation at the soffit/eaves and exhaust ventilation near the ridge. The U.S. Housing Authority suggests at least 1 square foot of attic ventilation for every 300 square feet of attic floor space, split evenly between intake and exhaust.
Signs of poor attic ventilation
Early detection of ventilation problems can save thousands in repairs. Look out for these warning signs:
- Excessive attic heat makes upstairs rooms too hot despite air conditioning
- Ice dams form along the roof edges, with icicles hanging from the gutters
- Unusually high energy bills from overworked HVAC systems
- Visible moisture damage under the roof sheathing shows up as water stains or condensation
- Mold growth or musty odors in the attic or upper living spaces
- Rust on metal components like nail heads, electrical boxes, and HVAC parts
- Wavy or sagging roof appearance from deteriorating decking
- Cracked or curling shingles damaged by excessive heat
Uneven temperatures between rooms might point to ventilation issues. Wet, compressed, or damaged attic insulation usually indicates ongoing moisture problems.
Fixing insulation and airflow issues
You need a complete approach that looks at both airflow and insulation:
Balance intake and exhaust ventilation first. Many contractors add attic vents, but don’t create the right balance. Exhaust vents need matching soffit intake vents to work properly.
Clear any blocked vents. Paint, debris, or misplaced insulation often block soffit vents and stop fresh air intake. Remember this key rule: never cover attic soffit vents with insulation. Use rafter vents to keep airflow while insulating fully.
Seal gaps between living spaces and the attic. Check around plumbing vents, electrical wires, and recessed lights. Use expanding foam or caulk to create an airtight seal that keeps warm, moist air out of your attic.
Your attic needs both ventilation and insulation to work together. Ventilation removes hot and humid air while insulation stops heat from rising up from below. This combination keeps attic temperatures steady and reduces HVAC strain.
Some roof designs make proper ventilation challenging. Roofs without enough ridgeline for exhaust vents might need power vents or roof louvers.
A certified roofing contractor can give you the full picture. They’ll check your current setup, suggest improvements, and ensure everything meets your climate and roof design needs.
Neglecting Permits and Local Codes
Most homeowners think only about materials and craftsmanship when replacing their roofs. They often miss a vital step that can throw the whole project off track: permits and code compliance. This paperwork might seem like a hassle, but it’s the foundation of making sure your new roof works well and protects your investment.
Why roofing permits matter
Roofing permits do much more than just satisfy government requirements. They make sure your project follows local building codes that are decades old and protect your home’s structure and your family’s safety. The process lets qualified officials check your project and verify it meets all standards, which cuts down on risks and future problems.
These permits give you valuable oversight through checks at different stages of the roofing work. Inspectors make sure contractors follow the right building practices and use the right materials, which reduces poor workmanship. Then this oversight helps your roof stand up to weather challenges throughout its life.
On top of that, it creates a paper trail of your home improvements. This documentation is a great way to get proof during property sales, since buyers and their lenders usually want to know that major renovations were done legally and up to code. A proper permit history makes your property more trustworthy and might boost its resale value.
Consequences of skipping permits
Replacing a roof without the required permits can lead to several serious problems:
- Financial penalties: Cities often charge big fines for unpermitted work, sometimes daily until you fix things.
- Insurance complications: Homeowner insurance policies need permitted work to cover you. If damage happens from unpermitted roofing, they might reject your claim, and you’ll pay for repairs yourself.
- Forced corrections: Local authorities might make you tear off and redo unpermitted work, no matter how good it looks, doubling your costs.
- Property value effect: Work without permits can lower your home’s value and make it harder to sell, since it raises red flags about construction quality and safety.
- Refinancing obstacles: Lenders check permit history when you try to refinance, which might block you from using your home’s equity.
The scariest part for homeowners? These problems don’t just go away with time. Issues with unpermitted work can pop up years later during sales, insurance claims, or when you need permits for other projects.
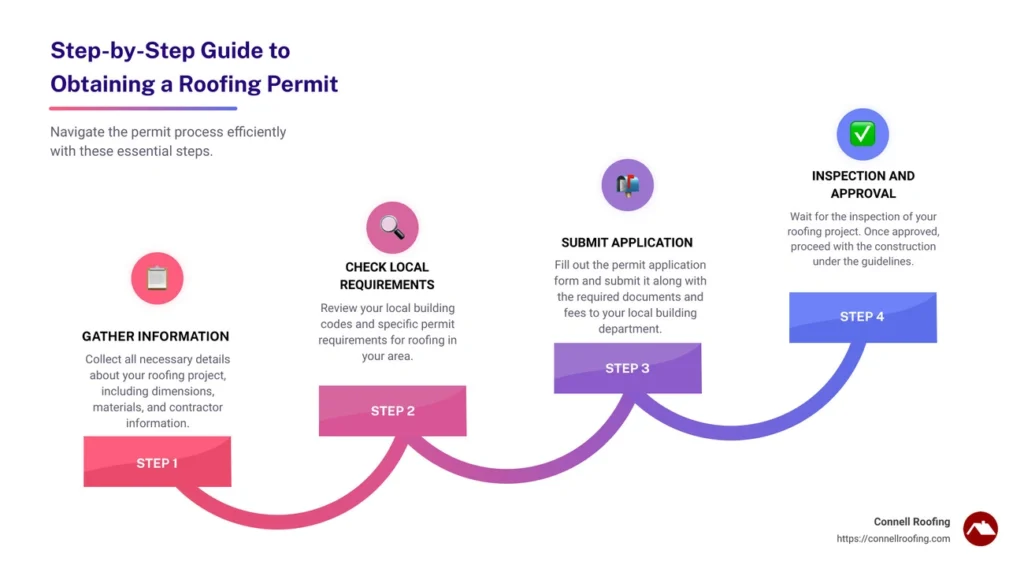
How to ensure code compliance
Getting the right permits doesn’t have to be complicated. Your first step should be calling your local building department while you’re still planning. Rules are different in each city – some need permits for any roofing work, while others only care about structural changes or full replacements.
Licensed, professional roofers make this process much easier. Good contractors know local codes and can handle permits for you. Before you sign anything, check if your contractor will:
- Get all needed permits
- Set up required inspections
- Fix any code issues found during inspections
Don’t just take a contractor’s word about permit requirements. Check with your building department yourself about what your project needs. Note that you, as the homeowner, are responsible for permit compliance, whatever your contractor says.
The permit process needs some paperwork about your roofing project, including material specs, work details, and contractor info. Budget for the fees and extra time, since permits can take anywhere from days to weeks based on where you live.
Reusing or Misplacing Flashing
Flashing failures are among the most overlooked yet substantial issues during roof replacements. This small component can guide major problems when installers don’t fit it properly or carelessly reuse it. These issues could undermine an otherwise excellent roofing project.
What is flashing, and why does it matter
Flashing is a thin, waterproof material that roofing professionals strategically install to direct water away from vulnerable areas and critical joints. Manufacturers make it from aluminum, copper, or galvanized steel. Roofers install it around chimneys, valleys, vents, skylights, and where the roof meets a wall. The material redirects water and stops moisture from getting beneath your roofing materials.
Flashing’s job is simple but vital—it creates a waterproof seal that blocks water from entering your home. The material protects your roof’s most vulnerable sections, where water damage usually starts. Your home becomes susceptible to leaks, structural damage, and early roof failure without proper flashing.
The core team sees flashing as one of the most significant components in any roofing system. Most leaks found on shingle roofs happen because of poor flashing performance or incorrect installation.
Architectural shingles were installed wrong due to flashing errors
Homeowners often make the mistake of reusing existing flashing during roof replacement. Old flashing might look intact, but reusing it substantially weakens your roof’s water protection. The previous installation leaves nail holes that make a watertight seal impossible the second time around.
Improper flashing installation around architectural shingles can show up as:
- Misaligned or incorrectly fastened flashing: Water can immediately leak beneath the roofing system
- Insufficient overlap: Professional installers need at least a 2-inch overlap between flashing pieces to prevent water infiltration
- Incorrect attachment methods: Building materials expand and contract, so nailing flashing to both the wall and the roof warps the material
- Using improper materials: The wrong type of flashing leads to quick deterioration and failure
Step flashing—used where a roof meets a wall—needs special attention. Each piece must overlap the shingle below and fit under the shingle above to create an unbroken water barrier. The entire system fails when installers don’t properly fit step flashing around architectural shingles.
Proper flashing techniques to avoid leaks
These key practices help prevent flashing-related issues during roof replacement:
New flashing works better than old materials. Fresh flashing gives the best water resistance and fits perfectly with your new roofing system. Old flashing deteriorates faster than new shingles and often causes early leaks.
Installation techniques matter a lot. Roofers should install flashing at a slight downward angle to move water away from the structure. Each piece needs to overlap the previous one by 2-4 inches to form a solid barrier.
Water runs downhill—but it’s worth mentioning that it can wick upward inside debris or back up behind ice. Your flashing system should handle both normal and unusual water movement patterns.
Step flashing installation requires careful attention to detail. Nail the flashing to the sidewall only, where both the next flashing piece and siding will cover the nail head. This approach prevents extra holes in the roof surface that could leak later.
Conclusion
A roof replacement is a major investment that just needs careful attention and proper execution. This piece highlights several critical problems that can derail even the best-planned roofing projects. Of course, knowing these potential risks helps you make better decisions and ensures your new roof protects your home for decades.
Quality shingle installation and underlayment are the foundations of a reliable roof system. The underlayment acts as your second defense line against moisture damage. On top of that, it takes proper attic ventilation and insulation to prevent early aging and damage that can get pricey. You must secure the right permits to protect your investment and your home’s future value. New and properly installed flashing will protect your roof system’s most vulnerable areas.
Taking shortcuts during roof replacement ended up causing shorter roof life, structural issues, and substantially higher costs over time. Quality materials and experienced contractors will pay off through improved durability and performance. Make sure to research, ask questions, and check credentials before starting your roofing project.
Your roof’s job is to protect everything under it – your family, belongings, and your home’s structural integrity. Now that you know the potential problems, you can tackle your roof replacement with confidence. This ensures the work meets professional standards and gives your home the protection it deserves.
FAQs
Q1. What are some common issues that can occur during a roof replacement?
Common problems include improper shingle installation, skipping or using the wrong underlayment, poor attic ventilation, neglecting permits and local codes, and reusing or misplacing flashing. These issues can lead to water damage, reduced roof lifespan, and voided warranties if not addressed properly.
Q2. How can I ensure my new roof is installed correctly?
Look for precise shingle alignment, properly installed flashing, and no visible leaks or moisture issues. Hire a reputable, licensed contractor, verify they obtain necessary permits, and ensure they follow manufacturer specifications. Regular inspections during and after installation can help catch any problems early.
Q3. Will my attic be exposed during the roof replacement process?
Your attic may be briefly exposed after the old roofing material is removed and before new materials are installed. However, if your roof decking doesn’t need replacement, the exposure should be minimal. Discuss the process and timeline with your contractor to prepare accordingly.
Q4. What should I consider when choosing roofing materials?
Consider factors like climate, home style, local building codes, and budget. Options include asphalt shingles, metal, tile, and slate. Each material has different durability, cost, and aesthetic qualities. Discuss the pros and cons of each option with your contractor to make an informed decision.
Q5. How long does a typical roof replacement take?
The duration of a roof replacement can vary depending on the size of your roof, chosen materials, and weather conditions. Most residential roof replacements take 1-3 days for asphalt shingles, while more complex materials like tile or slate may take longer. Your contractor should provide a detailed timeline before starting the project.
Sergio Muller
excellent explanation, I loved it…they explained it in a didactic and simple way